Monday, June 22, 2015

Monday Made It: Summer 2015 #2

Welcome Back! I'm joining up again with my friend Tara for another Monday Made It!

I have one to share with you today. It's more for my personal life, but I am planning to make a few to put in my room next year and give to my team for their beginning of the school year present :) I made these for an end of the year summer gift for my boys' teachers. There are 7 of them, so I had to think of something cost effective. I MAY have $5 in each of these, but it's probably more like $3 since I already had a lot of the supplies at my house :)
Take your cut boards and stain them or paint them. I decided to stain them because it was quick and easy. I'll probably end up painting the ones I will put in my classroom and give as gifts.

Once you have it stained or painted, take about 12" of burlap ribbon and tie a knot in the middle. Pull tight to get the center of the bow as small as possible. Secure to the board with hot glue (a teacher's BFF!).
I made two by using a wire to secure the bow in the middle (not the knot look). It's all fun and games until this happens... Ahhhh!
Secure the frame to the wood with hot glue. I like the frames with the magnetic strip on the back because it keeps the frame from melting. I applied my hot glue directly to the magnet. Here they are all lined up! These are great teacher gifts!


Thanks for checking out my crafty-ness! What are some things you have created lately that you just love? Go share it on Tara's Monday Made It!

Labels:

Monday, June 8, 2015

Monday Made It: Summer 2015 #1

Hey, y'all! I'm super excited to share my Monday {kind of} Made It with you this week! I'm going to try and link up at least every OTHER week! Next week I'll be on vacation...ahhhh! I'm linking up with Tara from Fourth Grade Frolics for her weekly Monday Made It... Summer style! This is probably one of my favorite linkys to participate in!
Here we go!

{I only have one... ha!}

A month or so ago, I purchased the Teacher Anchor from C Jayne Teach.
It was SUPER cute, but I wanted to add a little more color and some tabs to it. Well, first let me say that it all started with wanting to add 5th grade ELA standards to it. It ended up being a complete overhaul! I then decided to create a new planner cover {front & back}.


I have created custom tabs so I can see where I'm going!


 I added a few of my planning pages! I used the yearly planner so much last year!

This one breaks it down by quarter.

This was a staple last year for my planning. It helped keep me on track. I have one for each month!


 It took a lot of time, planning, and patience, but I am IN LOVE with my planer! It has the basics that came with my Teacher Anchor, but it has so much more! I will have to see what I think about this planner this year. I usually do my plans online, but it is so time consuming. I can't wait to write them down and be done. I think the additions I added will help me love it that much more! :)

Labels:

Monday, August 11, 2014

Monday Made It

As you are reading this... I'm back at school.  Insert sad face --> here!  I enjoyed my summer oh so much!  I am usually rested and refreshed for a new school year, but I don't really feel that way this year.  I feel like I still need a few more weeks to prepare.  Do you know what I mean?  

Anyways, ALL summer long I was lazy and pooled it by the pool.  I didn't do much of anything concerning my classroom.  Well, this past weekend I worked it, girl!  I found a few treasures and got a little crafty.


This was a natural frame that measures about 2.5 ft tall.  I painted it so my kiddos can get their picture taken in it on the first day of school.  I just love to see how much kids change in 5th grade.


This is a partial made-it.  All I did was paint the legs pink.  I am going to use this cute chalkboard easel to write directions on for open house.  I am going to have the parents write their name and address on an envelope, so all I have to is slip a good note in and mail it off!


This one is my favorite, but it's not quite finished yet.  When I get to school tomorrow I will need to hot glue the clothespin on the solid frame.  I am going to place this on my desk and clip my peek of the week to it each week.  If you want to know more about my peek of the week, click here.

This is a made-it because it was a chalkboard that said Prayer Requests at the top.  I know... I can't believe I painted over that, but it will work for just what I want it to!

Here's the back!


I finally made me some of the super cute pencil buckets!  Now to recruit a sharpener at the end of each day!  All I need to do now is put washi tape at the top of my pencils.

There you have it.  A quick and easy made-it.  I will have to link up when I get home from work... **sigh**

Labels:

Tuesday, July 30, 2013

Finally Back!

Ya'll....

It has been a crazy life lately.  If any of you help out with VBS at church then you can relate when I say we had VBS last week.  I.was.so.exhausted!  Not to mention that both of my babies had a stomach bug.  I was nurse by day and craft instructor by night... and so so tired.  We didn't get home until almost 10pm every night.  Then, my Internet has been out... say what??  Not having Internet is not acceptable! I do have to say that it was kind of nice.  I did get behind on a ton of things which is no fun....

Anyways, I wanted to share a couple of things that I have worked on in the past 2 weeks.  If you have emailed or commented and I haven't responded, I'm so sorry!  Like I said... my Internet has been out.

Okay... here's my LATE Monday Made It!
I posted this on my Instagram since my Internet was out.  


Several commented wanting to know how I made it.  Well, you can find that tutorial here.  I have actually placed this on my classroom wall above my bookshelf.  I think it's a bit too large, but since I made it... might as well use it!

Next on my list... :)

I did manage to update my classroom twitter account.  I'm so excited to use this with my students!  I have also linked it to my class website so all my updates from my website will be posted to twitter.  Some on Instagram were asking how I planned on using this.  Basically, I am planning to use twitter (have my parents follow me) and Remind 101 to keep my parents updated on homework, major assignments, and tests.  This way, we have no surprises!  Here's my twitter... love it!

I love that the design not only matches my blog, but it also matches my classroom and my classroom website.  LOVE!

I've also been doing a little shopping.  This is nowhere near what all I have purchased {because that would just be embarrassing} but I fell in love with the super sized post-its.  And, at BOGO, I couldn't resist.  What will I use them for??  Who knows!

Lastly, my #1 seller in my TpT shop is my 4th grade vocabulary set.  I made this last summer and they are pretty neutral to go with just about any decor.  I used these in my classroom last year and I loved them!  


I can't tell you how often my students used them while they were working.  The headers were already up when school started.  As we learned new things, we would use the vocabulary cards during instruction and review and once the unit was over, I would add them to our word wall.  It was great!  I have decided to create the same exact file but with gray chevron.  I'm super excited about how these turned out!  I also changed the font so it's a little more easier to read from afar.  It's on sale for Wednesday only.  You can view it here.

Thanks for hanging with me!  I have a lot of other things to share but that's for another post :)


post signature


Labels:

Monday, July 8, 2013

Monday Made It

Good Morning!  It's Monday Made It time, ya'll!
I'm excited to share what I've been up to this past week.  I've been spending a lot of time getting some of my larger crafty to-dos done and last week was no different.  I've been working in my classroom here and there for the past few weeks.  I usually spend about two 8 hour days a week.  I've moved classrooms so I had to do A TON of unpacking.  I felt like that was going to take forever!  I finally got my unpacking done.  If you are interested in the progress I made, you can check out my latest post here.

So, I got some crazy idea that I *needed* to paint all my furniture white... really?  What was I thinking??  It has taken a ton of paint and a ton of time.  But, it's done.

Ok, on to my Made It.  This is not my original idea.  Jill from Controlling My Chaos shared her 2012 classroom with us in this post here.  I love that she teaches middle school but still decorates her room for her kiddos!

I fell in love with her bookcase {among other things like her pencil caddy}....


Isn't it lovely how she has a beautiful design in the back?? 

I knew I wanted this for my teacher bookcase because I wasn't sure it would hold up to the kiddos if I tried it on the ones they would use.  So....

I searched high and low for some stylish and modern scrapbook paper that would fit in with my decor... nothing... couldn't find it... not even at Hobby Lobby.  I was beginning to think it wasn't going to happen.  I could always use fabric, but gosh... fabric is just outrageous!  $7.99/yd... no thanks!  Then, I got the grand idea to use wrapping paper.  Hobby Lobby didn't even have a pattern there that I liked either, but my wonderful Target did, of course!
So, I painted my bookcase, left the backing brown, and used Mod Podge and wrapping paper to back it.  This was not an easy task.  The wrapping paper was huge and difficult to work with.  Not to mention it was thin and wanted to rip every time I painted over it.
However, I did get it done and I am so happy with the outcome!!  I just love how modern and simple it looks :)

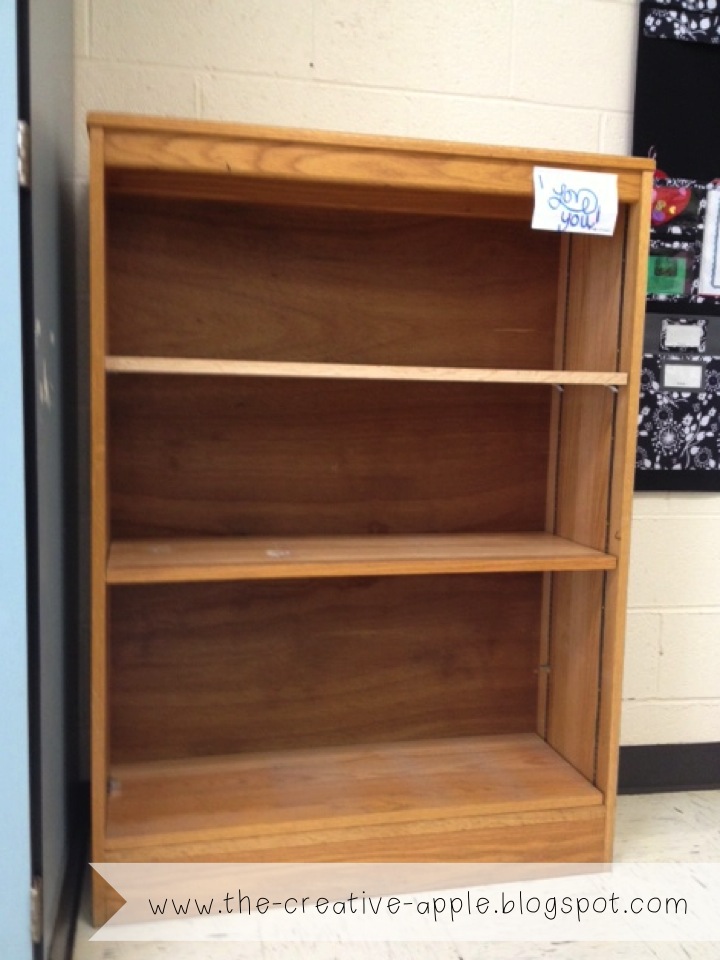
Here are the before/after photos.

before...  ugly plain jane... nothing cutesy about it.. just not me..

 after.....  {ahhemmm... please excuse the mis-matched baskets on the top shelf.. I was just making sure they would fit..}


I just loved what I did with it!  So me!!!

Lastly, I wanted to update an older Monday Made It I did a few weeks ago.  Remember my "READ" letters?  Remember my "D" was sold out?

Well, I went back and purchased it.  Then, when I went to paint, I noticed that I wasn't too crazy about some of the other letters I had painted because they didn't really go with my classroom.  So, here are my new letters.... I just love them!

My favorite has got to be the "D".  I just love it!


post signature

Labels:

Monday, July 1, 2013

Monday Made It

I am linking up once again for Tara's Monday Made It.

I have been waiting impatiently to share this photo with you... but I knew I wanted it to be my Monday Made It since I... well... made it!  I was so excited to make panels for my large windows in my classroom.  I knew I wanted it to feel like something I would put in my own home so I opted to go with two tall panels.  I basically just went to the fabric store and browsed around for what I wanted.  This is the end result... and I love it!


I'll post more of my classroom today, but I wanted to get it a little more organized before I did that.  I just love these curtains and all the pretty things hanging from the ceiling.  And yes, the large white round lantern is actually a light.

Here's where I got everything...
fabric- Hobby Lobby
curtain rod and hooks- Wal-Mart
pink shag rug- Garden Ridge
large white lantern- Ikea (only $15 for the entire setup)
puff balls- The Knot

I won't bore you with the 'how-tos' but I will share the steps just in case you would like to make your own... they are SUPER easy.

First, get all your supplies together.  You will need 
-your actual curtain fabric and a white liner fabric (I just used white cotton.. the cheapest they had.)
-scissors
-measuring tape
-straight pins
-sewing machine

Place your curtain fabric with pattern facing your lining.  I just left mine the width of the fabric (I think it was 44".)  Cut the fabric the length you will need.

Now, place straight pins around the edge of the entire panel being sure to leave space to sew between the pins and the edge.  Yes, you actually need to do this.  It keeps the fabric in place and prevents it from moving around.  I use to not do this..... such a time and frustration saver!

Sew around the edge, leaving an opening about 6".

Cut off any excess fabric.  You want your edge to be as close to your seam as possible.

Now turn it inside out (this is why you left the gap.)  Lay it flat and iron the edges flat.  Now sew around the panel one last time being sure to completely sew up the gap left by tucking in any fabric and making it look like the rest of the edges.

Now you are ready to apply your hooks for hanging.  If you are not wanting to use hooks then you will need to make a pocket for the rod.

Making your own panels is so easy and you can find the exact fabric you want instead of settling for something from a store. I just love mine!  Now go link up with Tara!


post signature

Labels: