Classroom Update #2
Well, I said I wasn't going to post pictures of my room until it got a bit more organized, but I'm excited to share the progress I've made thus far. If you remember from my post here, my classroom looked something like this only two short weeks ago.
And by the time I left that day, it looked like this...
I had made some progress, but most of it was moving things around just so I could walk in it. I then spent several days sorting things and trying to figure out where in the world I was going to put everything {enter my rant about how small my new room is compared to my old one.} After SEVERAL {literally... like 20} hours of working in my room and doing a little shopping and creating, I now have the beginnings of a classroom. I'm excited about how far I've come, but I still have a long way to go. Most of those 20 hours were spent painting my shelves white... say what?? That's a lot of painting. Thank God I'm through with that for right now.
This is my reading corner and the window/door that leads to the outside. Those are the beautiful curtains that were featured on my last Monday Made It. I really love those curtains. I went into Hobby Lobby with the intention of purchasing curtain fabric... I just didn't know what I wanted. I knew I wanted chevron, I was just clueless about the color. I finally settled on grey since it can go with just about any color scheme. The large white shelf will hold my book baskets that I am patiently waiting on to arrive. I wanted something that would go with my decor so I ordered these really cute ones from Really Good Stuff.
These cubbies are kind of in the back corner and I also have some in the front of the classroom. They usually hold student books, but I am planning on using them to hold my book boxes and reading binders. I teach two classes so two students will actually share one book box and cubby. I'll post more on this when I have it all setup and figured out. I will be putting more shelving in. These are not anchored to the wall yet so I'm waiting for that to happen before I start getting it organized and ready. I will also have things on top.. but not yet.
This is my small group area. I'm still trying to figure this out since the table sticks so far out that my students have no space to even put a chair. I'm not happy with my desk arrangement so I'll have to move it around a bit. My favorite thing about this area is my wheasel. It's basically a whiteboard on an easel. This is where I create all my anchor charts with my students. It can also roll around the room to the whole group area if needed. The whiteboard will hold my CAFE board which I have at the end of this post because I need a few suggestions.
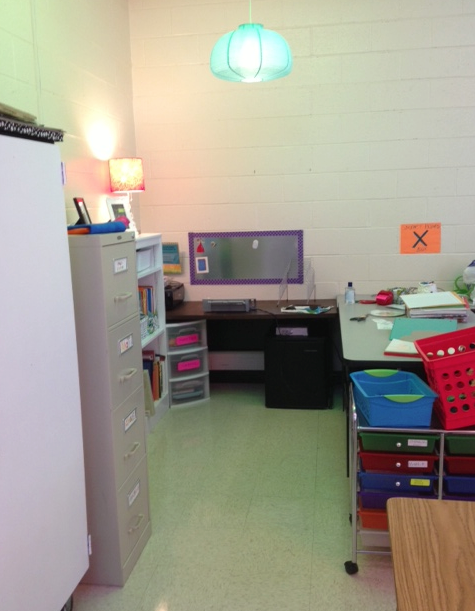
This is my teacher area. It's a bad angle but I didn't think to get one from the front. It's still pretty boring... blah! I still need to hang my diploma and things.
This is my whole group area {and son & niece.} I think I'm going to move the rug away from the wall more so the students can have the entire rug to sit on. I just love this area and the rug I scored from Garden Ridge when we went on our shopping trip. I'm still not sure what I will use the shelf for. Right now it has my Writer's Express and Dictionaries on it as well my paper baskets. I'm thinking about moving the paper baskets some where else because I want the least amount of traffic on my cute rug as possible.
This is my entry and is probably the closest area to being done. All I need to do is add my homework board to the section of the whiteboard you can see from here. I house all my supplies (crayons, markers, glue, highlighters, etc.) in the drawer organizer that I got from Ikea. I'm proud of myself because I mounted that to the wall by myself... pretty impressive.
Here's an overall view. Please excuse the mess every where {and my other niece..lol!}
This is going to be my CAFE board. I had originally planned on leaving the board white since this is a common color in my classroom. But, the more I look at it, the more I want to put pink fabric over the board. What do you all think? I want this to be a focus area so the pink would make more sense.
One last question.... Do any of you have your word wall on your whiteboard? I have a large white board on the wall perpendicular to this one that I was thinking about using as my word wall. If you have used this idea before, what did you think about it? Did you glue magnets on your words and use that feature?
Just trying to figure things out! I am hopefully planning on getting some things on my wall next week... we shall see :)

Labels: Class Photos, Classroom Setup


18 Comments:
Oh, I see color, and baskets and happy children, even if they aren't students, it's a great start! :) Looking good!
~Brandee
Creating Lifelong Learners
Thanks, Brandee. And yes, I love color :)
My word wall has been on my white board before and yes I glued magnets to them! Looks good! Wish I could get into my room!! :)
Before they re-modeled our school, I had my word wall on a scratched up chalkboard. I covered it with paper and I had words with magnets on the back that I used.
Kelly
I'm Not Your Grandpa, I'm Your Teacher
Mrs. Thornton! The room is coming along! As a first year teacher, I'm realizing from your post what I have to look forward to (20 hours...Geez!) But I count it all joy.
What's up with the colorful ceiling lights? Is that from the school or did you create those covers/shades? Looks good!
I have used magnets and blue sticky tack before. The sticky tack takes less time to do than the magnets. Sometimes if you cut the magnets too small they will slide. Looks great! I am new to your blog, so you may have already mentioned this before, but I'm really interested in how you made your lights so colorful.
Love the chevron curtains and the lights around the classroom! It certainly looks inviting.
Erica
Shepherd's Shining Stars
Thanks, Katie :) I wish I couldn't... it seems all my summer has been spent there. But yet I will complain when its time to go back ...lol
Thanks for giving advice. I'm torn between the two....
It's fabric panels that I have cut to size. I really don't like bright lighting and the kids don't either. So, I cute fabric to size and hang it over the lights for a calming effect.
I haven't, I just mentioned it above. It's fabric hung with hooks. It tends to calm the setting a bit :)
Thank you, Erica!
Your room is looking great! I love the poms and the lights around the board.
Thank you :)
Your room is looking fabulous! I really love the way you handle the bright lighting. I just may have to copy yours.
Last year was the first year I used my white board for a word wall and it seemed to work out pretty good. I got peel and stick magnets for the backs of my words.
Dee
webbill@Entergy.com
You just go right ahead. You will be amazed at the difference it makes in your lighting. Thanks for your advice :)
I also really like the fabric on the lights! :)
I know that you posted this way back in the summer, but where did you get all of you hanging lights? I love the lights above your desk and you lights in your reading corner, also how did you do the overhead lighting?
Post a Comment
Hi! I would love to hear from you!
Subscribe to Post Comments [Atom]
<< Home